How to Build Realistic Scenery for Your O-Gauge Layout on a Budget
May 14, 2026

Wrote this up after I got the same question for the fifth time at a train show. Saving us all the hour-long conversation — here's the real answer.
The fastest way to make an O-gauge layout feel like a real place — and the part most beginners avoid the longest — is the scenery. A bare plywood table with a loop of FasTrack reads as "toy train." The same loop surrounded by realistic ground cover, a hillside, and a single well-placed structure reads as a working railroad in miniature. The good news is that great scenery does not require expensive specialty products. You can build a convincing scene for under $200 using materials from your local hardware store and a few targeted purchases from Woodland Scenics.
Start with the Foundation: Foam Board
Pink or blue extruded polystyrene foam insulation board from Home Depot or Lowes is the single most useful scenery material in the hobby. A 4x8 sheet of 2-inch foam costs around $35 and provides terrain for an entire small layout. Carve it with a serrated bread knife to create hills, cuts, and embankments. The foam is light, holds plaster and paint well, and absorbs sound, which makes your layout quieter when trains run. Stack and glue layers with Loctite PL300 foam-safe adhesive to build up taller features. For broader build context see our vibe train room setup guide.
Ground Cover: Real Dirt Beats $30 Bottles
Woodland Scenics sells ground foam in tiny bottles for $5 to $10 each, but the secret most experienced modelers know is that real screened dirt works just as well — sometimes better — and costs nothing. Walk into your yard, scoop up a cup of soil from a flowerbed, run it through a kitchen sieve to remove debris, and bake it on a cookie sheet at 200°F for 30 minutes to kill organic matter. The result is fine, varied, perfectly natural-looking ground cover. Glue it down with diluted white glue (one part Elmer's to three parts water with a drop of dish soap) sprayed through a misting bottle. The finished surface looks like the real ground because it is the real ground.
Static Grass and Foliage Without Breaking the Bank
Static grass applicators run $50 to $200 for entry models, but you can fake the effect by sprinkling Woodland Scenics turf onto wet glue then pressing fibers vertical with a stiff brush. The result is not as dramatic as a real applicator but reads as grass at viewing distance. For trees, the cheapest convincing option is a bag of cheap floral wire bundles from a craft store wrapped in fine-foam foliage clusters. Plan to spend an evening making 10 to 15 trees rather than buying $8 prebuilt models. Browse Woodland Scenics turf on Amazon for the basics.
Rocks and Cliffs From Plaster
The most convincing rock faces in model railroading come from castings made with Hydrocal plaster and rubber rock molds. A bag of Hydrocal is around $25 and produces enough castings for a 10-foot cliff face. Mix it 2:1 with water, pour into the mold, let set 30 minutes, demold, and glue to your foam terrain with plaster slurry. Paint with thinned brown and black acrylic washes for instant convincing geology. For complete beginners, Woodland Scenics also sells pre-made plastic rock outcroppings that glue on directly, but the cast versions look notably better at the same price.
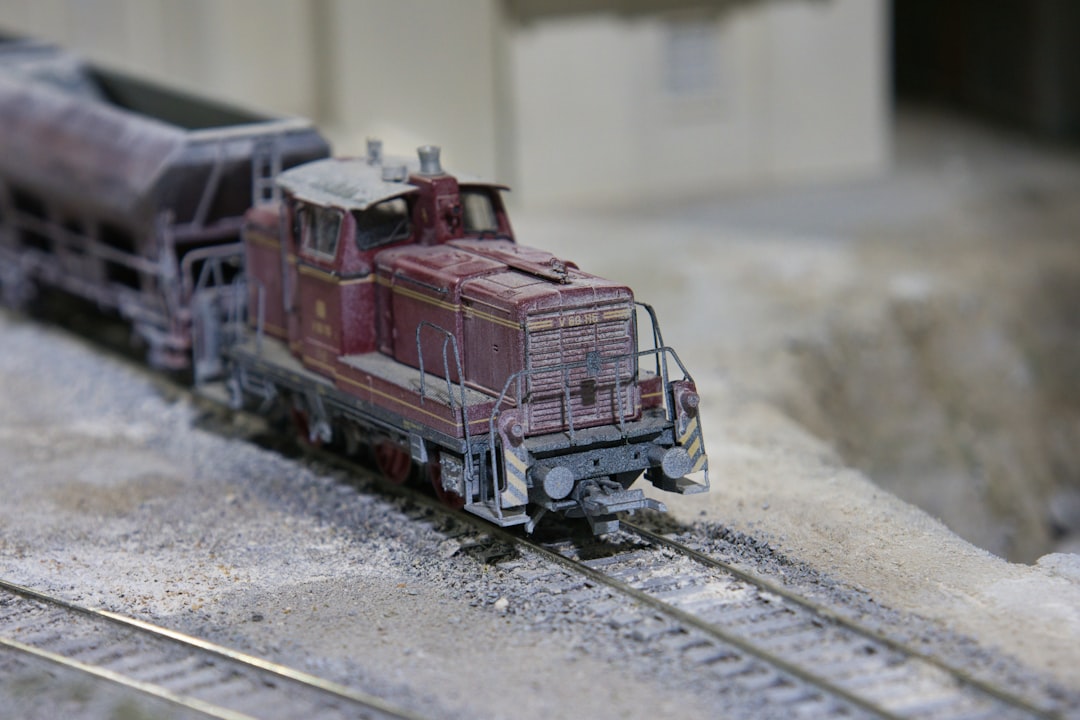
Structures: One Hero Building Beats Five Cheap Ones
Beginners often buy a dozen cheap snap-together kits and scatter them across the layout. The result looks like a model train show, not a real place. A single well-painted, weathered hero structure — a small freight depot, a country store, an industrial loading dock — anchors a scene and makes the entire layout feel more real than a town full of generic buildings. Spend a weekend painting and weathering one structure to display quality, then build the next one. Lionel and MTH both produce O-gauge structures, and third-party manufacturers like Atlas O and Korber Models make outstanding kits for under $50.
Water Without Resin Disasters
Realistic water has been the bane of beginning modelers for decades. The trick is acrylic gloss medium — the same product painters use, available at art supply stores for $10 per jar. Paint the lake or stream bed in shades of blue, green, and brown, then pour a layer of gloss medium directly on top. It self-levels, dries clear, and looks convincingly like still water. For moving water effects, drag a stiff brush through the gloss medium just before it sets. This technique replaces $80 specialty water products with results that are visually identical.
The Patience Is the Product
The truth about budget scenery is that the materials are cheap but the time investment is real. Plan to spend two evenings per square foot of finished scenery if you want it to look right. The hobbyists with stunning layouts are not the ones who spent the most money — they are the ones who spent the most patient hours layering ground cover, weathering structures, and adjusting until the scene reads as a place rather than a project. Build slowly, look critically, and trust your eye. The vibe rewards craftsmanship over budget every time.
Newsletter
Weekly O-gauge tips & reviews
New reviews, layout ideas, and hobby news — straight to your inbox.