How to Ballast O-Gauge Track for a Realistic Finish
April 20, 2026
Most of what you'll find on this topic online is rewritten manufacturer copy. This isn't. It's what I've learned running trains on a real basement layout.
Why Ballasting Makes Such a Big Difference
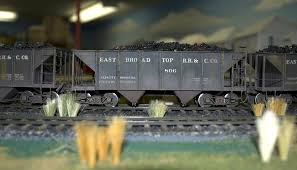
You can have the best locomotives money can buy, a meticulously wired layout, and realistic scenery in every corner — but if your track is sitting on bare plywood or unfinished foam, the whole scene falls apart. Ballasting is the single technique that ties your trackwork into the landscape and makes it look like a real railroad.
Fortunately, ballasting O-gauge track is a beginner-friendly process. It takes patience more than skill. Once you've done a few feet, you'll wonder why you waited so long.
What You'll Need
Before you start, gather your materials:
- Ballast — Arizona Rock & Mineral, Woodland Scenics, and Noch all make O-scale ballast. Coarse or medium grades work best for O-gauge. Gray granite or brown cinder both look prototypically correct depending on your era and railroad.
- Diluted white glue — Mix 1 part PVA (white glue) with 2 parts water. Add a single drop of dish soap to break surface tension so the mixture soaks in rather than beading up.
- A spray bottle filled with plain water plus a drop of dish soap.
- A soft-bristle paintbrush or an old toothbrush.
- A small spoon or scoop for applying ballast.
- Paper towels for cleanup.
If you're working with Lionel FasTrack, note that its built-in roadbed raises the rails and creates a specific ballast profile. You'll work around the molded roadbed rather than filling between the ties the way you would with Atlas O or Gargraves flextrack.
Step 1: Protect Your Trackwork
Before a single grain of ballast goes down, test-run your locomotives and make sure everything operates cleanly. Ballasting is semi-permanent. Fixing a derailment-prone switch after ballasting is a frustrating afternoon you don't want.
Tape over switch machine openings, uncoupling track recesses, and any track connections you may need to pull apart later. A small strip of painter's tape over the rail joiners saves headaches.
Step 2: Apply the Ballast Dry
Using your spoon or scoop, pour ballast along the center of the track, then use your brush to work it into the spaces between the ties and to slope it down along both sides of the roadbed. The goal is a smooth, tapered shoulder on each side.
For FasTrack, apply ballast to the outer edges of the molded roadbed to blend it into your subroadbed or scenery base. The transition from FasTrack's plastic roadbed to your layout surface is the area most people overlook — a thin layer of ballast here does a lot of visual work.
Don't worry about being perfect at this stage. You'll touch it up before gluing.
Step 3: Wet the Ballast
This is where most beginners make their first mistake — applying the glue mixture before wetting the ballast. Skipping the pre-wet step causes the glue mixture to push the ballast around and create craters.
First, lightly mist the dry ballast with your water-and-soap spray bottle. Use a gentle spray — you're dampening, not flooding. Wait 30 seconds for the water to soak in.
Step 4: Apply the Glue Mixture
Using an eyedropper or a small brush, apply your diluted PVA mixture directly onto the damp ballast. Work in 12–18 inch sections. Capillary action will pull the glue down through the ballast and bond it to your subroadbed.
Don't touch or brush the ballast while the glue is wet. This is the hardest part — just let it soak in. Apply enough that you can see it glistening, but don't create puddles.
Step 5: Let It Dry Completely
Leave the section alone for at least 24 hours. In humid climates, give it 36–48 hours. The ballast will lighten as it dries, which is normal. If you see loose patches after drying, apply another thin wash of diluted glue.
Step 6: Clean the Rail Tops
Once dry, run a track cleaning block or a dry cloth along the top of both rails to remove any glue or ballast that crept up. Then make a slow test pass with a locomotive to confirm smooth operation before moving to the next section.
Tips for Cleaner Results
Work in short sections. Trying to ballast an entire loop in one sitting leads to rushing and mistakes. Do 18 inches at a time.
Vary your ballast color slightly. Real railroads don't have perfectly uniform ballast. Mixing in a small amount of a darker shade adds subtle realism.
Don't ballast inside switches. Keep ballast well clear of switch points — even a few trapped grains can cause a switch to stick or misalign.
Save leftover ballast. You'll need it for touch-ups and future layout expansion.
The Payoff
Ballasting is one of those tasks that delivers a disproportionate visual upgrade for the time invested. After your first section dries, you'll immediately see the difference — the track looks embedded in the earth rather than sitting on top of it. That illusion of weight and permanence is exactly what separates a convincing layout from a toy train set. Take your time, work in sections, and let the glue do its job.
Newsletter
Weekly O-gauge tips & reviews
New reviews, layout ideas, and hobby news — straight to your inbox.