How to Add Lights to O-Gauge Buildings and Structures: Complete 2026 Guide
June 4, 2026
How do you add lights to O-gauge buildings and structures? Nothing transforms a layout faster than lit buildings glowing at dusk — windows warming the scene, street lamps casting pools of light, a station platform pulling you visually into the miniature world. This vibetrains.com guide walks you through everything you need to know to add lights to O-gauge buildings: LED options, wiring methods, power supplies, and tips for the most realistic effects.
Quick Answer: How to Light O-Gauge Buildings
For most O-gauge buildings: use warm white LED strip lights or pre-wired LED units rated for 12V DC or 14-18V AC, powered by a dedicated accessory transformer separate from your track power, wired through a terminal block under the layout. Single buildings need a single LED inside (5-15 lumens); larger structures benefit from 2-3 LEDs to avoid one-spot brightness. Total cost: $20-$50 to light a typical small-town scene with 5-10 lit buildings.
Why Building Lights Matter More Than You Think
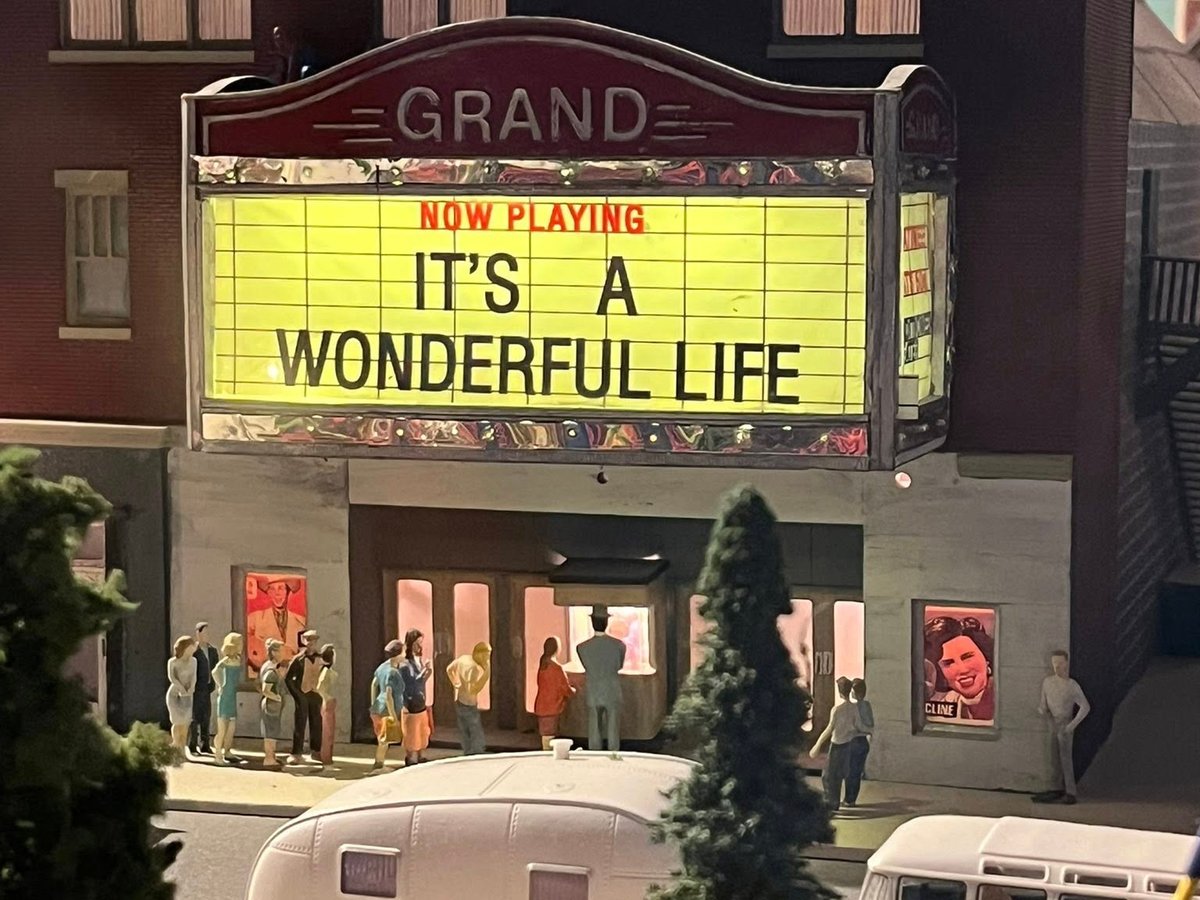
Lighting is the single highest-return-on-investment scenery upgrade for an O-gauge layout. A small-town scene with unlit buildings looks like a static model; the same scene with warmly lit windows, a flickering bar sign, a station platform glow, and a few street lamps becomes a living scene that draws viewers in. The change is dramatic enough that many serious layouts dim the room lights for operating sessions specifically to showcase the building lighting. For overall train room ideas, see our ultimate vibe train room setup guide.
LED vs Incandescent: Which to Use
Use LEDs. Period. Incandescent bulbs were the only option for decades but have three problems on modern layouts: heat (especially in plastic structures, where incandescent bulbs can melt walls over time), short bulb life (especially in always-on accessory situations), and high power draw (a layout with 50 lit buildings using incandescents draws serious amperage). Modern LEDs solve all three: virtually no heat, 50,000+ hour life, and tiny power draw. The only argument for incandescent is the "warm flicker" effect — but modern LED flicker modules replicate this perfectly.
Color Temperature: Choose Warm White
Warm white (2700K-3000K) is the right choice for almost every O-gauge building. It matches the look of incandescent and gas-lamp era lighting that virtually all O-gauge layouts simulate, regardless of era. Pure white (4500K-5000K) looks like modern fluorescent and feels institutional. Cool white (5500K+) looks like a hospital. Only specific scenes (modern industrial buildings, hospitals, certain commercial signage) benefit from cooler temperatures. When in doubt, warm white. Browse warm white LED model train lights on Amazon for ready-to-install options.
Power Supply: Use a Dedicated Accessory Transformer
Don't power building lights from your track transformer. Run a dedicated accessory bus and transformer for two reasons: track voltage varies as locomotives draw power, which makes lights flicker; and shared accessory load can introduce noise into command-control signals (TMCC and LEGACY). A Lionel CW-80, MTH Z-4000 spare output, or any 14-18V AC transformer rated for 3-5 amps gives you a clean dedicated source. For LEDs specifically, you can also use 12V DC power supplies (inexpensive on Amazon) — but you'll need to ensure your LEDs are DC-compatible. For full wiring guidance, see our O-gauge layout wiring guide.
Wiring Method: Terminal Block + Distribution
The standard wiring approach: run a pair of heavy bus wires (16 or 18 AWG) under the layout from your accessory transformer along the path of your buildings. At each building location, drop a feeder pair to a small terminal block mounted under the layout. From the terminal block, connect each building's LED leads with thin hookup wire run up through a small drilled hole in the layout surface. Label each terminal so future troubleshooting is fast. This setup is modular — you can add new buildings later by just tapping into the bus at the nearest point.
How Many LEDs Per Building
For small buildings (single-story houses, small stores): 1 LED in the center of the structure. For medium buildings (two-story stores, freight depots): 1 LED per floor for even lighting. For large buildings (industrial buildings, multi-story office structures): 2-3 LEDs distributed across the interior to avoid hot spots. The principle is even distribution — one bright point of light through windows looks fake; soft even glow looks real. For windows with curtains or shades, place the LED behind the window plane rather than directly against it for the most realistic effect.
Pre-Wired vs DIY LED Installation
Two approaches. Pre-wired LED kits (Woodland Scenics, Miller Engineering, third-party model train LED specialists) come with the LED, resistor, and lead wires ready to install. Just glue the LED inside the building, connect the leads to your accessory bus, and you're done. Easier and faster, but more expensive per unit ($3-$8 each).
DIY LED installation uses bulk LEDs from electronic suppliers ($0.20-$0.50 each), resistors sized to your voltage, and your own wiring. Costs a fraction per unit but requires basic soldering and calculating resistor values (use an LED calculator online). For 12V DC supply and a 3.2V forward voltage LED at 20mA, you need a 470-ohm resistor. For 14V AC supply, you need a slightly larger resistor and a rectifier diode. DIY scales to large layouts where the per-unit savings add up substantially.
Adding Animation: Flicker, Fade, Strobe
Beyond steady-state lighting, animated lighting effects make scenes come alive. Flicker modules simulate fire, candlelight, or gas lamps — perfect for chimney glows and old-time street lamps. Fade modules simulate the slow warm-up of incandescent bulbs being switched on. Strobe units simulate police lights, emergency vehicles, or arc welders in industrial scenes. These modules typically cost $5-$15 each and plug inline between the power supply and the LED. A few well-placed animated lights in a layout full of steady lights creates a sense that the scene is alive.
Exterior Lighting: Street Lamps and Signs
Exterior building lighting is just as important as interior lighting. Lionel, MTH, Woodland Scenics, and Miller Engineering all sell pre-wired street lamps and lit signs in O-gauge proportions. The lamps create pools of warm light on the road surface beneath them — the more lamps you can fit (within reason), the more realistic the night-time effect. Lit business signs (Miller Engineering's animated signs are particularly impressive) add commercial-district vibe that no static building can replicate.
Common Lighting Mistakes
Four mistakes to avoid. First, over-bright LEDs: an LED too bright for a small structure makes the walls glow visibly. Solve with a higher-value resistor or diffuser tape. Second, cool-white in residential buildings: feels wrong; use warm white. Third, shared track power: causes flicker and command-system noise. Fourth, visible LED hot spots through translucent walls: solve with light-blocking paint on the inside of plastic walls (flat black, then a second coat of matte tan or gray over the windows from inside).
Lighting Your Layout Stage by Stage
Don't try to light everything at once. Start with the buildings closest to your operating position — interior lighting on a few key structures gives immediate scenic impact. Add street lamps and exterior lights next. Add animated lighting (flicker, strobe) once the steady-state lighting is in place. Save large industrial-area lighting for a later phase. This staged approach lets you enjoy the layout while it improves continuously. For scenery work that complements lighting, see our scenery guide.
Frequently Asked Questions
What voltage do O-gauge building lights use? Most pre-wired model train LEDs are rated for 12V DC or 14-18V AC. Check the specifications before connecting. Higher voltages will burn out LEDs immediately.
Do I need a separate transformer for building lights? Highly recommended. A dedicated accessory transformer avoids voltage drop, flicker, and command-system interference from sharing with track power.
How much does it cost to light O-gauge buildings? About $20-$50 for a small-town scene with 5-10 lit buildings using pre-wired LEDs. DIY installation drops this to $5-$15 for the same scene.
Can I use Christmas tree LED lights for O-gauge buildings? In a pinch yes, but the color temperature is usually wrong (mixed colors or cool white) and the bulbs are sized awkwardly for building interiors. Dedicated model train LEDs look much better.
How do I keep building lights from showing the LED hotspot? Use diffusion: paint the inside of the building walls flat black with windows masked, then paint the windows from inside with translucent tan or warm white. Or use frosted LEDs designed for diffuse output rather than focused.
Final Word
Adding lights to O-gauge buildings is the single best investment you can make in your layout's visual impact. A few hours of wiring and $50 in LEDs transforms a static scene into a glowing miniature city that's impossible to stop looking at. Start with one building, see the effect, and you'll be lighting the rest of your layout in a weekend. For more lighting and scenery ideas, see our backdrop installation guide.
Newsletter
Weekly O-gauge tips & reviews
New reviews, layout ideas, and hobby news — straight to your inbox.